Really Real DIY Gel Manicure

3 steps I wish I had known are super important: - buff the shine off - apply a pH balancing agent -apply a gel bonder

3 steps I wish I had known are super important:
– buff the shine off
– apply a pH balancing agent
-apply a gel bonder

When I learned gel manicures could last up to two weeks, and I could do it at home I was on board immediately. I got everything I thought I needed, chose an inexpensive LED lamp that came with little gel polish samples, and went to town. Then I was disappointed. My polish was coming off really fast, in sheets of paint, and faster than standard nail polish. To say they were chipping would have been an understatement. I took to the internet only to find women saying they either love their gel manicures or it just is NOT working. Tutorials weren’t solving my problem either. For some reason there are tons of people masquerading that they have some really helpful information to share, and then they tell you what everyone already knows, paint neatly within the lines, correct your mistakes, make sure to use a base and top coat, yada-yada-yadah, things I was already doing. Eventuallly I pieced together the missing pieces of the puzzle from various sources. It took quite some persistence, but I wanted a long lasting manicure A LOT. Oh the joy it was going to bring me to see beautiful, unchipped, perfect paint for days at a time. Things haven’t been the same since.

I like to wear my gel mani for one week. I change it every weekend because I get bored of the same color, but if I wanted to, I could stretch it to 2 weeks, especially if I were to reapply the top coat and reinforce the tip by capping the edge. I usually don’t want to though. My nails grow much longer now that I use gel, they’re well protected and it’s a ritual to redo them on Saturday mornings.

Here’s what I found was the difference between a long lasting gel manicure and a dud:

Prep, prep, and PREP. Maybe it’s because you don’t have to spend as much money to prep your nails well and it’s not very glamorous that no one seems to talk about it. If you asked a salon manicurist, they know this very well.  But if you didn’t know it in the first place why would you ask much about preparation for a manicure? You probably wouldn’t. Follow the steps in the image I’ve posted above and you should be golden. I think naturally we all know our hands should probably be clean when we’re about to paint our nails, but some of the other prep work seems minor. It’s not. There were 3 things I didn’t do that were going to make or break my mani. I didn’t buff off the shine from my nails. Apparently, this really helps adhere product. I have a little anecdote about this. After I learned the importance of buffing, my boyfriend got a flat tire on his bike. He bought a patch to patch up the hole. It was a little rubbery square patch, some adhesive, and a tiny piece of sandpaper in the patch kit. Impatient as he is he looked at the sand paper and was all blah, I don’t need this! So he glued on the patch. The patch came off. I told him follow the instructions, you really do need to buff the area around the hole with the sandpaper, it wont stick unless you do it, it’s just like my manicures! He did it, and it worked. So there you go, life lesson, how to patch a tire, your mani skills can be applied elsewhere in life!

There are 2 more prep steps I had no idea about. I think it’s a secret manicurists keep so their nails will always look better than yours unless you visit the salon (I’m kidding lol). Those 2 steps are, applying a pH balancing agent, otherwise known as a nail dehydrator and a gel bonder. The pH balancing agent gives you a proper canvas to paint on, so your natural oils etc will not mess up your mani. The gel bonder, is exactly what it is, a bonding agent. This helps your base coat stick to your actual nail, along with the color followed by it.

The pH balancing product I use is OPI’s Bondaid. You only need to use a little every session and it lasts for practically forever so it’s completely worth it. I have yet to run out of the first bottle I ever bought. This can also be used to improve your non-gel nail polish application. You’ll use it as much as your top and base coat and it can improve the length of our manicure.

Bonding agent, as the box says, "maximizes adhesion of acrylics, tips, wraps, glue, and polish."

Bonding agent, as the box says, “maximizes adhesion of acrylics, tips, wraps, glue, and polish.”

The gel bonder I use, is simply the same gel bonder available from the gel polish brand I buy. I like to buy “ibd just gel polish”, mainly because the price is awesome. My favorite color is probably peony bouquet, a very nice bright pink with a shot of purple hue. I would describe it as a hot pink orchid.

ibd just gel peony bouquet polish

ibd gel bonder "powerbond"

I hope this info helps you achieve the long lasting manicure you want at home! These are certainly things I wish I had known from the start. By the way, I always use an LED lamp and LED gel polish, not UV. I wrote about my LED lamp a little in my post 5 Reasons to Try Gel Color. I also wrote about my choice of using LED in LED vs. UV Gel Lamps and am happy to report about a month later Allure also wrote about the topic in their article “The Gel Manicure Lowdown: UV vs. LED” in which they spoke to some beauty professionals who went as far as saying UV is obsolete. Glad to be on the same bandwagon! Allure magazine has always been my favorite beauty publication.

Until next time, stay beautiful! Smooches.

Destroy Face Fuzzies

I don’t know about you, but at the top of my beauty priority list is probably skin, particulary facial skin, followed closely by hair. If there was some kind of beauty apocalypse and  we had nothing left but could choose one attribute of natural physical beauty for keeps, whether you’ve got it or don’t feel you do, which feature would you pick? Say the rest of you would be somewhat uglyfied in this cruel cruel scenario… For me it’d be a tough tie between facial skin and hair. These are beauty traits I envy.

This is why, if I find a hair from the neck up and it’s not on top of my head nor is it an eyebrow hair, it’s liable to annoy me to death until it’s gone. It ruins the nice smooth and even skin I hope for. I’ve tried almost everything to find a solution I like, but in the end none of them are truly satisfying and I go back and forth between methods depending on how much time I have. Two things I haven’t tried and I’m not willing to commit to even though they might work are laser hair removal (can’t justify the price, and too intense, call it hair removal denial), and the no-nos and trias of the world, not lasers but similar in concept and done at home. I’m not even sure fancy at home hair removal tools would work on me because they are said to work best on someone with high contrasting color in skin and hair- someone fair with raven black hair is perfect for it. I’m tan/olive in complexion, maybe on the light side with black hair.

Here’s how my battle with unwanted facial hair has gone:

Tweeze – slow and potentially scarring. It’s the first thing on this list from NYMag posted in 2012, Fifteen Bad Beauty Habits You Need to Quit.

Shave – manly. Nothing makes you feel less of a girl than putting a razor to your face. I’ve done this a long time sparingly, though I’ve never cut myself and have felt like it was a taboo secret, even if other women probably do it too. It’s not really to get rid of peach fuzz, those are barely there, it’s more about getting the few gnarly rebels. And don’t get me started if my boyfriend catches me doing it. He doesn’t judge but it feels totally awkward to me! And we’re going on 5 years together. People swear against this, I don’t think it’s so terrible and believe the fear is a myth – more reputable sources seem to agree and that’s all I need to know, BUT I still don’t think it’s a great solution for practical reasons.

Removal creams / lotions – a la Nair. Some brands are smelly, sometimes not effective on tougher hair and if you try to keep it on longer when they clearly say not to, well, just don’t.

Epilate – my first epilator was the Bliss Philips Bikini Perfect Deluxe Spa edition when it was first introduced through Sephora.

This was the set I had

This was the set I had

I don’t think they sell that exact version anywhere anymore but back then it was a little bit of an investment ($ in the triple digits). With 6 attachments I had no idea I would use the epilator most because I had never tried one. It hurt a little at first and seemed scary. I mean it’s straight out of a horror story – a spinning wheel of pinching metal teeth coming at you? I was desensitized to it fast though, it’s really just a lot of quick tweezing. It’s an automatic electric tweezer. Guess that title isn’t catchy enough though.

The Philips trimmer available today - seems to be the same without the Bliss extras but you still get goodies and it's only $37 now.

The Philips trimmer available today – seems to be the same without the Bliss extras but you still get goodies and it’s only $37 now.

The thing about epilators is, it’s less precise than other methods and the hair needs to be long enough and not flush with the skin for it to work well, so you need to try doing it in different directions and if the hair is super short you’re probably out of luck. It’s still a decent option though, and I like the trimmer and micro shaver attachment too you can use for your body. Mine lasted for years, I lost count, but in the end it must have lasted at least 5 years before the battery just died on me and stopped recharging. For a few years now I’ve had the Panasonic ES-WD5 -P Ladies Wet/Dry Epilator. It was $38 bucks and it does the job. It’s an old version now but there’s a lot of similar epilators out there for the same price so it was a matter of looking at customer reviews to pick mine.


Wax – Ugh, waxing. Probably the most effective so the hairs don’t come back as fast but still ugh. The pain! My face and neck are actually the only areas I can stand to wax because the hairs are fine and weak enough to not hurt so much when I wax them off. It’s also not the quickest process, especially if you do it yourself. I’ve rekindled my relationship with wax by going with hard wax, which is strip-less. There’s no paper or cloth involved. I didn’t like other types of wax. I have a GiGi Wax Warmer* which is great. It can get a bit too hot but in that case I switch to a lower setting and wait for it to cool a little. It was worth it.

GiGi Wax Warmer

GiGi Wax Warmer

The wax I’m using now is Satin Smooth Calandula Gold Hard Wax with Tea Tree Oil*. I like it except it’s a little too stringy for me. Maybe I don’t have the temperature just right. If it’s too warm and I make a mistake it’s likely to create long gooey threads of wax that just don’t quit. My favorite wax so far is actually Parissa Hot Wax.* It’s perfect BUT, it comes in a little tin that looks like a tiny frying pan. You can put it on the stovetop to heat. If they sold it in tubs I’d probably stick with it but I believe it only comes in the tiny pan. With my clumsiness of course I’ve spilled some and once forgot it and burned the wax. It was terrible when I burned it, there was a persistent fog everywhere in my apartment and the ingredients burned into smoke had a harsh effect. It seems to cling and seep into your nose and throat. So yeah, I wouldn’t do the stove option if you’re easily distracted! When I run out of wax I’ll probably try GiGi’s hard wax. Hopefully I’ll love that one.

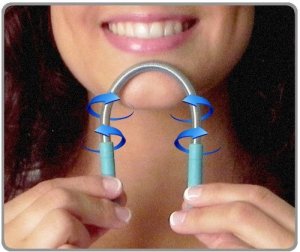
Threading tool – This is something I more recently discovered that I could do at home. It’s safer than tweezers because you can’t use it to try and pick at ingrown hairs, and if you do it well it’s faster but not as fast as an epilator. Sometimes there’s not enough time to plug in the epilator so this is a nice option in between tweezer and epilator. It’s not the same threading you can get done at a salon though. Instead of using string it’s a springy tool that you roll over your skin. The springs pinch up the hairs like a tweezer. It’s not super precise but it doesn’t really need to be as long as you’re not trying to get between your eyebrows. There are knockoffs but I went with the Bellabe Facial Hair Remover* because it’s not expensive and I didn’t want to waste time trying something new the dirt cheap way. I just wanted it to work.

bellabe

Bellabe Facial Hair Remover

So you’ve made it this far. You must hate facial hair as much as the rest of us. Tell me about it! I’m curious.


LED vs. UV Gel Lamps

When I first researched at-home gel polish, I, like many of you probably have, had to decide between a UV lamp or an LED lamp to cure (the way you set) the gel polish. This choice can be really expensive or pretty affordable, cheap even. I remember when I searched for info the best thing I could find was a little specs chart with a side by side comparison of the two. I still don’t know who originally created that chart but I see the same one floating around and I’m guessing it’s getting “borrowed” extensively. Today I was going to post a comparison of the two but I decided not to because since my initial search this has become old news! Instead, I’m going to talk about what other people are saying about this topic in general, to help sort through the truth and the half-truths. Gossipy of me I know. But that’s the job of the average consumer. Who likes to waste time and money?

In my earlier post 5 Reasons to Try Gel Color I shared the lamp I went with, and my happiness with it. It didn’t seem like a complicated life decision at all because it just worked. No fuss. Google search “LED vs UV lamp” and you’ll get plenty of results, but they say different things. Sometimes they say opposite things. Uh oh.

Here are the selling points that made me go with LED:

  • Quicker curing time
  • Longer lasting bulbs and no bulb replacement. If it dies, you need a new lamp, not replacement parts
  • Didn’t have UV in the name (more on this shortly)

It seemed like a win-win situation. The only con of an LED lamp that I care about as a customer is that not all polishes are compatible with it. UV on the other hand is compatible with all gel polishes. This turned out to be a little con. I’ve found most gel polishes I’m interested in work with LED as well. It’s probably in the best interest of any gel polish company to make polish that works with both lamps. This is one of the “features” they usually emphasize so that people know they aren’t buying the wrong polish. Another potential con was that LED is more expensive, but that’s old news too and now I have one so it’s certainly not anymore!

Most of the posts out there in the world wide web get the above simple characteristics right, or at least there’s consensus, but they have differing “facts” about UV light exposure. NOT having UV in the name, made me feel better about going with LED, and many will say you can avoid it altogether with an LED lamp. I’m guilty of thinking this is how it worked. But if you dig a little deeper and find some references with some scientific backing, you’ll find they both have UV light in some form. In fact it looks like in the light industry some call it UV LED light. So what does this mean? None of are safe! Panic! Nope. I’m still loving gel polish, maybe instead of just sunscreen on my face everyday I’ll also put it on my hands once a week or two. The studies released say one of two things. One, the exposure is negligible, or two, LED is the lesser of two evils. They actually don’t even say evil. They don’t even say bad. It’s more like a “no-no” fudge brownies are a sometimes food, not an every day food. So my mind is made up. LED light is to my (exquisitely gel polished) hands, as chocolate is to my diet.

Morning Face Pick-Me-Up

Had the luxury of getting a classic/European facial about two months ago. It’s one of the perks at work I can take advantage of once in a while to compensate for stress. Oh the stress! Well, at least my employer tries. I do appreciate the generosity so trust me it’s not taken for granted! I think that was actually my first time getting a full-blown facial, uncomfortable extractions and all (an extraction is like mini skin surgery with a little scalpel-like noose tool and a bright light over you). It was like getting my nose detailed. Worked like a charm!

My lovely facialist asked me some things I’d expect, like what’s my skincare routine. I told her what I do on a good day, which definitely means on a day I have energy and am not being lazy about personal care. You know how personal care can often be the first thing to go out the window… Her questions and advice renewed my spirit to stick with a routine for my face. One of the things she said casually was that many people tell her they have trouble with unbalanced feeling skin. You might know the feeling, oily at some spots and dry at others. I definitely fall into that normal/combination skin category with an oily nose and forehead, otherwise known as the t-zone, and dryness prone everywhere else.

She told me toner fixes that right up. Now I’ve tried toner before, usually as a sample. It’s something I never took very seriously and I thought of it as a gimmick just to sell me more beauty products like there aren’t enough options already. It does feel nice if you get one that works but it seemed like a dainty totally unnecessary, not very practical luxury. I’m picturing a princess spritzing her face, oh-so dainty and graceful. But I figured, let me try this since this woman knows how to truly make my face glow, and she’s not trying to peddle products.

I took it a step further too and wow. Best morning skincare tweak ever. Such a small change and such fancy results. I wasn’t going to pay a fortune for toner so I went for a nice big bottle of Thayer’s Cucumber Witch Hazeland refilled an empty sample spritzing bottle of an expensive “skin revitalizer” (ehem, toner). If I didn’t have one laying around I probably would have bought this simple Fine Mist Spray Bottle* or used a nicer atomizer* that I already own which is perfect for carrying in your purse and looks a bit prettier. I spritz on the toner every morning after an exfoliating scrub and before lotion. It really does make a “where have I been” difference. It hydrates skin and balances it out so everything feels even, nothing too oily and nothing too dry. It gets rid of morning skin ickyness. The best part is once you fill a bottle that gives you a nice misty spritz it takes 2 seconds to do this every morning. The toner lasts a long time this way too. And there a couple of witch hazel varieties out there probably worth trying, like rose water, original, unscented, peach, and lemon. Gotta say, I’m quite pleased!

Reuse a spritzer or spray bottle, or buy an inexpensive atomizer and refill with witch hazel.

Reuse a spritzer or spray bottle, or buy an inexpensive atomizer and refill with witch hazel.

5 Reasons to Try Gel Color

The Unstoppable Mani

Typing all day at the office, washing your hands, showering, cleaning, and the most dreaded housechore – dishwashing – all of these things are out to kill your manicure. It’s ridiculous how many things you have to avoid to not chip your nail polish. Maybe you, like me, got used to this and considered two or three days of a fresh looking mani a triumph. It’s not. I know the color, the shine, and the luxurious sparkle had you in a trance. But guess what? Once you switch to gel color your lacquer is going to be practically obsolete. Don’t get rid of the old stuff or anything, I would never ask you to do that, I’m just saying it’s good for a special occasion, probably one night, the other days, rather the other weeks, you and gel polish will be B.F.F.s. All that stuff you couldn’t do before, not a problem!

Reinforce & Grow your Natural Nails

I’ve seen quite a few bad things written about getting your nails done, usually connected to a bad experience or two. If you or a nail tech filed your nails thin, yes that’s not good for the health of your natural nails. And yes if you cut off your cuticles which are there for a reason you are choosing beauty over function (totally not necessary btw, it’s more of a preference for a precise look). It doesn’t have to be that way. I used to wonder why I couldn’t grow my nails, they were usually short and not cute short, more like stubby and broken, even bitten when I was little and didn’t know how to stop bad habits. Well, I tried those protective clear polishes that promote growth and didn’t get great results. With the help of the world wide web you’ll find many people don’t get the results they hoped for. But I do have to say, painting them with clear strengthener or color polish in general makes you take better care of them. Here’s were gel really excels. You see, gel color acts like a little shield. It’s nothing short of awesome. For the first time in forever I can keep my nails long and it’s not like I’m trying to beat a Guinness World Record. They don’t break for a really long time because they’re protected. You can feel this instantly. Gel polish is sturdy. You won’t feel like your fingernails are vulnerable and exposed to the environment, whatever that may be for you.

No More Slooooow Drying

15+ minutes. That’s how long you’re supposed to wait for your nail polish to dry. And that’s with a fan! To quote a once semi-famous ghetto lady (if I were her I would have looked into trademarking) AIN’T NOBODY GOT TIME FOR THAT. 30 to 60 seconds is how long gel polish takes to cure (really no more drying) using an LED lamp. This is where ladies at home may put their foot down. A lamp? Yes a lamp. It’ the most significant investment you will need to switch over to the dark side – no, not the dark side, it’s really sunshine, lollipops and rainbows over here – pssst, you’re on the dark side! This significant investment was for me… drumroll please… $25. I have one. It’s tiny. It’s cute. It sits aside on my bookself when I’m not using it, and I haven’t had the need to replace it or even want to try another one; it’s exactly what I needed and it just works. It’s good for at home use. The one I have is the SensatioNail LED Lamp*.

My SensatioNail LED Lamp in action. The light doesn’t photograph well and I think you’re not supposed to look straight into it because a unicorn may lose it’s horn. BUT doesn’t it look super futuristic???

Easy to Perfect, No Smudges!

Gel has a different consistency from regular polish. It’s thicker and it has a nice property of leveling itself out. What this means for you is that you’ll be much more like to get an even, smooth looking finish. It has a different look from laquer. It’s glossy, it’s mirror-like/glassy, at first you might think it looks a bit plastic. A little too perfect. That impression will probably go away and you’ll decide it’s way better! It looks more expensive. Like watching impossibly perfect nails on a tv commercial or in a magazine ad.

Same Price or Dare I Say Lower

Just like regular polish, there are $14 bottles and there are way cheaper bottles for half the price. So far I’ve found even the way cheaper gels are very close in quality to higher priced ones, unlike runny $1 nail polish you can find in the beauty section of your average pharmacy. Aww, I feel bad, I used to love those lol. But it was hard to make them last and they needed a billion coats! All in all you can save money will gel polish because you won’t need to apply it as often. The supplies you need and the expense are also not as bad as some might lead you to believe if you try it at home.

In my next few posts I’m going to go over what supplies you need and what you don’t need to switch to gel color. I’m also going to go into detail about how to do it right! Believe it or not there is a right way to do your nails, whether it’s regular polish or gel! If you’ve had trouble making your polish last, you’re not crazy, you probably just skipped an important step or two. You can improve your mani I promise…


About Me and About This

Welcome to my blog!

You can call me Libby. I’m a working gal in NYC and an evening grad school student. I live with my boyfriend and my bunny, or rather they live with me. It’s a new day and I hold down the fort, yeah feminism and whatnot! Actually, we both hold down the fort and if I could I’d put that bunny to work too, life is expensive out here. Anyway I’m a busy young lady interested in the same things many of us are. I am constantly trying to find some balance between career, personal wellbeing, my home, relationships with loved ones, leisure and just plain fun. Ah, the hamster wheel of life…

So about this blog – out of all the things I can manage to keep up, doing my nails  beats all. I haven’t stuck to a diet, a workout routine, a salon, nothing! As nice as a spa or salon may sound they can give me unreasonable amounts of anxiety. I’m a curly haired girl and have had one too many disappointing or self esteem hurting hair salon experiences. I’ve also almost always struggled with my weight but I know so many of us do so I’ll just leave it at that. In short I’m all brains no brawn. I’m all for learning something new everyday but being nerdy can be a lot of work. Of all things not bookish I do for myself, doing my nails at home once a week or biweekly is here to stay.

Lets call it a hobby. And boy have I had some “ah-hah!” moments with this hobby. Have you ever felt like you must be doing something the wrong way all your life? And then maybe you got your act together and figured it out and you wish you knew back then what you know now? No?!? It’s ok I’m still lost regarding most of life’s little secrets too, but manicures are not one of them. I’m finally happy with my own at home manicure.

So where did “MiniGoody” come from? Well it all started when I decided, this is it, I’m doing it, I’m taking the plunge. I was on a mission to try every nail art look ever and then I quickly realized, geez you have to buy a whole lot of little trinkets in excessive, wasteful quantities if you want to sample every style you can find lol. And then I had nostalgic flashbacks of how much money I used to blow at Sephora in college because my tuition + room and board was paid for (cough, barely) for a whole semester at a time and working part-time was strictly for feeding myself and feeding my girly desires. Oh how foolish was I? But it was awesome and I’m glad I did it because I would not otherwise understand how much of a boring adult work zombie I’ve become. MiniGoody was born of that nostalgia. All of those little indulgences I took for granted. Next I decided there had to be an easier way to get all my nail art trinkets and I found there really wasn’t, so the least I could do is gather it all and make it available for others. But alas Libby nor MiniGoody is a major brand so let’s start smaller.

Allow me to reintroduce myself, I’m Libby and THIS (jazz hands around imaginary blog bubble) is MiniGoody. I’m going to share what I’ve learned about manicures and nail art at-home and maybe a few other random mini secrets if I think you might care to know. Feel free to share your savvy as well.

Shameless plug: Follow minigoody on Pinterest